The Art of Soundproofing and Acoustic Treatment of Studios
In the harmonious world of music production, where every note and nuance matters, creating an environment that fosters optimal sound quality is essential. Whether you're a seasoned professional in a state-of-the-art recording studio or a passionate beginner crafting tunes in a cozy home setup, the key to unlocking sonic brilliance lies in soundproofing and acoustic treatment.


The vital synergy between soundproofing and acoustic treatment in music studios cannot be overstated. Soundproofing acts as a protective fortress, shielding musicians from external disturbances, ensuring an undisturbed space for both professionals aiming for flawless recordings and beginners exploring
their artistic realms.
Simultaneously, acoustic treatment refines the internal sonic landscape, enhancing clarity and tempering reverberations. Together, they create an immersive sanctuary where every note, lyric, and beat can be expressed and appreciated in their purest form. This harmonious integration of soundproofing and acoustic treatment transforms studios into spaces where creativity flourishes, elevating the music to unparalleled excellence.
Soundproofing – A Fortress Against Unwanted Noise
In the realm of music creation, silence is golden. Soundproofing is the knight in shining armor that guards against the invasion of unwanted noise. Whether you're battling street sounds, chirping birds, or the occasional household clamor, soundproofing materials create a shield, allowing you to focus solely on the symphony you're crafting.
Professional Studios
For the professional musician, investing in top-tier soundproofing solutions is an imperative. Cutting-edge materials such as mass-loaded vinyl, acoustic foam panels, and resilient channels can transform a studio into an impenetrable fortress, ensuring that every recording is free from external disturbances.
Home Studios
For the home studio enthusiast, entry-level soundproofing solutions can make a world of difference. Weatherstripping doors, using heavy curtains, and strategically placing furniture can significantly reduce external noise, providing a more conducive environment for creative expression.
Everly Pump
Available in three widths, these pumps feature walkable heels and provide non-slip outsoles. With a pair of pumps like these Naturalizer Everly heels, you may be able to get through the day without any discomfort. They sit below the recommended 3-inch heel height and feature the brand’s signature open-cell foam padding to make it feel like you’re wearing the shoes and not the other way around. Choose from one of three widths (narrow, medium, wide) and strut with a pair of shoes that works for day or night, casual or special occasions.
Round-Toe Chunky Heels
These rounded-toe shoes provide an antibacterial, deodorizing cushion to keep your feet fresh. Anyone who has bunions should pay special attention to the toe box. Rounded or square boxes are better because pointed ones will add more pressure in that area. These heels from Vivaia have rounded toes to prevent worsening bunions, and their upper areas are knitted with flexible stretch. They’re also quite low at a little less than two inches to ease the pressure from your feet. And they have a non-slip rubber sole to help you stay put. If you have wide feet, we recommend selecting one size up for extra comfort.
Acoustic Treatment – Crafting a Sonic Oasis
In the realm of music creation, silence is golden. Soundproofing is the knight in shining armor that guards against the invasion of unwanted noise. Whether you're battling street sounds, chirping birds, or the occasional household clamor, soundproofing materials create a shield, allowing you to focus solely on the symphony you're crafting.
Low-range Frequencies
In the deep abyss of low-frequency sound, where bass notes resonate, the need for precision is paramount. Acoustic panels designed for low-range sound treatment act as sculptors, taming the rumbling waves and preventing them from engulfing the room. Strategically placing bass traps and panels in corners and against walls absorbs and diffuses these low-frequency vibrations, transforming a space from a potential sonic swamp into a clear, defined realm where each bass note finds its distinct place in the composition.
Mid-range frequencies
As we ascend into the heart of the auditory spectrum, the mid-range frequencies become the soul of the music. Acoustic panels tailored for mid-range sound treatment refine the character of vocals, guitars, and other central instruments. Placed at reflection points and key surfaces, these panels absorb excess mid-range frequencies, mitigating the risk of unwanted reverberation. The result is a studio environment where every lyric, every chord, and every instrument shines with clarity, allowing the true essence of the composition to unfold.
High-Range frequencies
At the zenith of the sonic spectrum, the high frequencies sparkle like stars in the musical galaxy. Acoustic panels engineered for high-range sound treatment serve as guardians of the delicate treble notes. Positioned strategically on ceilings and surfaces prone to reflection, these panels act as a buffer against harsh reverberations. By taming the sharp edges of high-frequency sound, they create a space where the subtle nuances of cymbals, strings, and vocals can be appreciated without distortion, ensuring that the studio ambiance remains crisp and conducive to artistic expression.
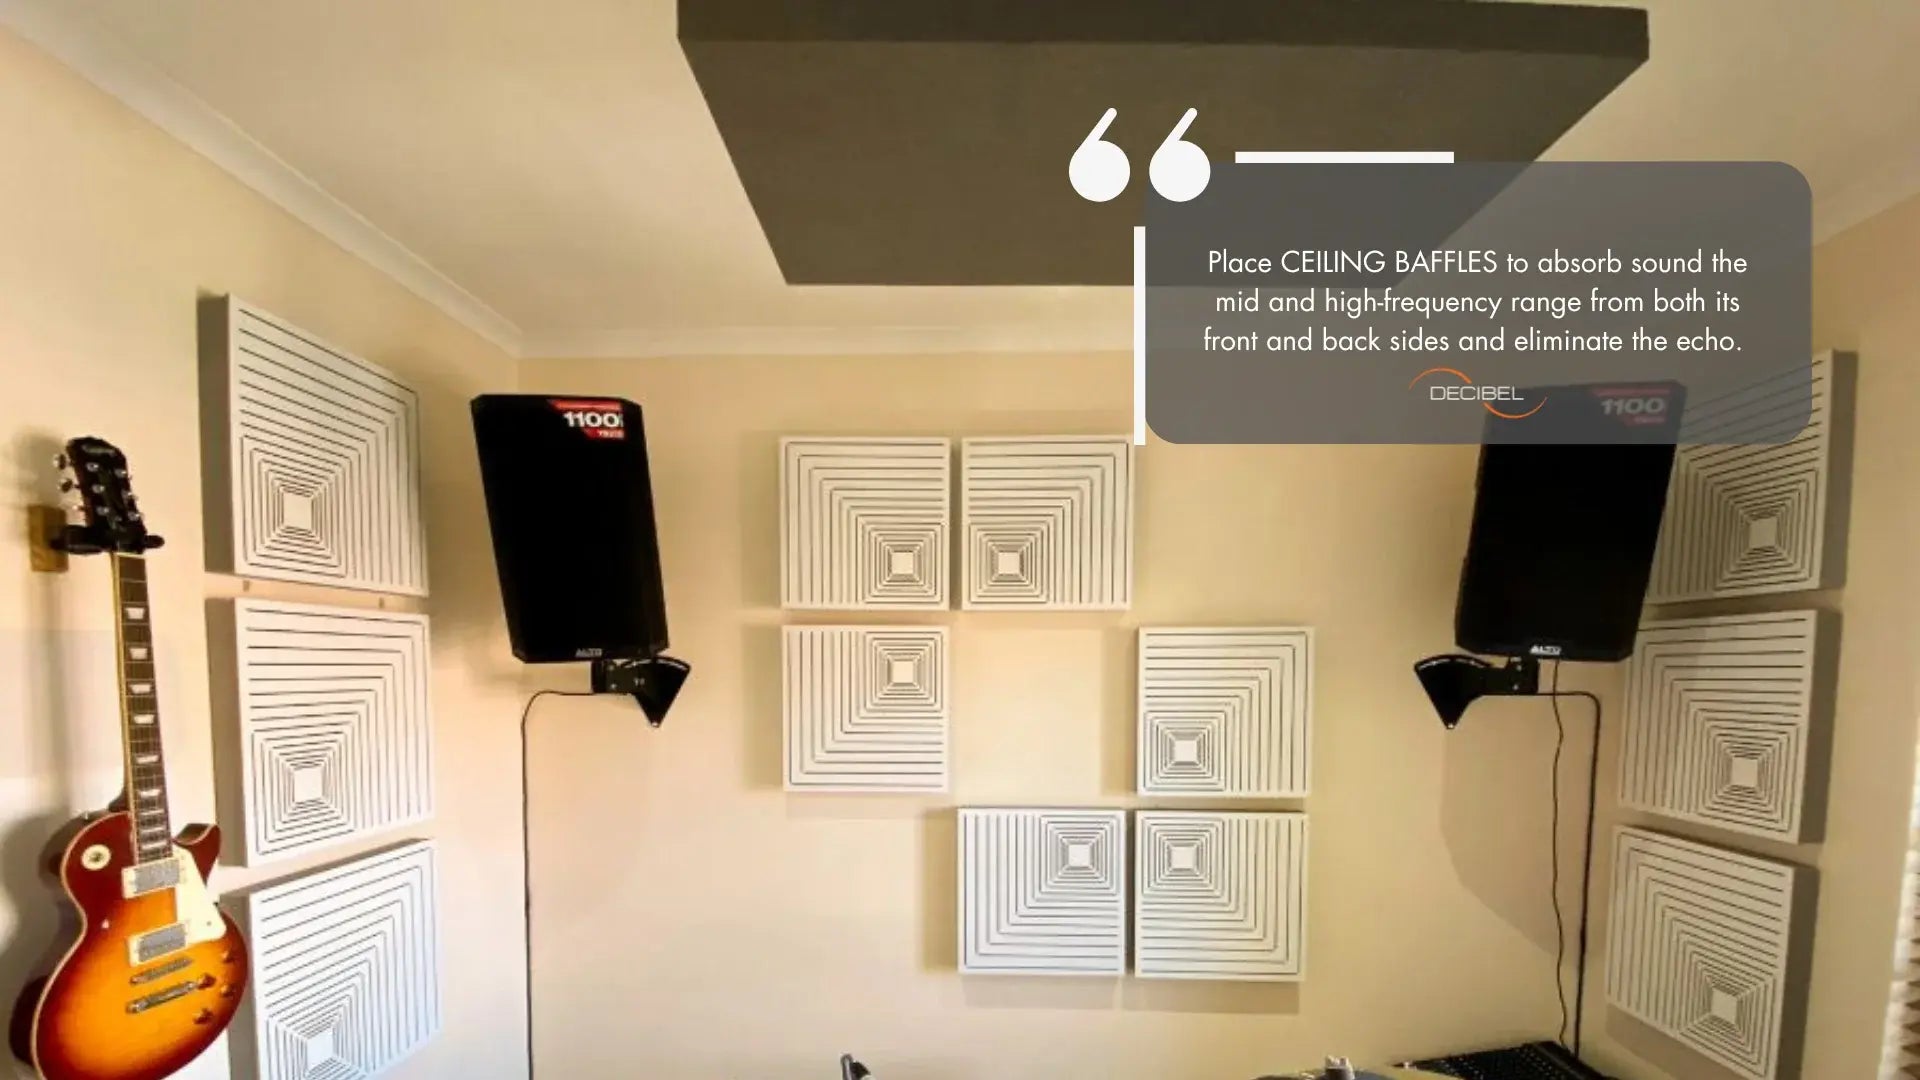
Ceiling treatment
In the orchestration of studio acoustics, the often-overlooked canvas of sound above us plays a pivotal role. Ceiling acoustic treatment is the celestial touch that harmonizes the entire sonic experience. Specially designed panels suspended overhead serve as custodians, intercepting and diffusing sound waves that ascend towards the heavens. By addressing the reflective tendencies of ceilings, these acoustic treatments curate an environment where the music can breathe freely, untethered by unwanted echoes. The result is a studio space where each note gracefully dances in the air, creating an immersive auditory landscape that envelops both the professional maestro and the aspiring artist in a celestial embrace.
4 Tips to Find Comfortable Heels
Know Your Right Shoe Size
It may sound silly, but a 2017 survey by the Podiatric Society found that almost half of the women in the UK alone are wearing the wrong shoe size. Your foot sizes change over the years, especially after having kids. When buying shoes, measure both width and length. A lot of people think it's wide or vice versa and it's not, so make sure to check that out before shopping.
The Thicker The Heel, The Better
Avoid thin heels: the stilettos. These heels often cause your feet to wobble around. If you wear stilettos every day, you may want to consider a chunkier heel style and change it up a bit. Chunky heels don't wobble as easily as high heels, which helps prevent your ankle from snapping.
Try a Shoe with More Top Coverage
The more coverage you have on the top of your feet, the better. Sometimes, you can wear high heels all day and they don’t bother your feet as much. In the summer, you can try something with an ankle strap or a large wide strap over the top. If you are worried about blisters and friction, you might want to try something that covers more of the top of your foot.
Opt for Platform Heels
Platform heels are more comfortable than single-sole heels because the actual heel is shorter than the heel height. The platform also reduces the impact of your feet touching the ground, reducing discomfort. However, thicker platform heels can cause your foot to wobble and your ankle to snap, especially if the platform is very thick and the heel is stiletto. The shoe should be a good ratio between a thick platform and a fitting heel.
Fun Facts About High Heels

Men's high heels are made to be comfortable and look good, so they will replace the standard sneaker as an everyday shoe. Men are also likely to buy more expensive shoes in order to get a better fit and style. The market for men's shoes will grow by 10% every year through 2024, according to Business Insider. In 2023, there will be almost 4 billion pairs of men's shoes sold each year—a nearly 50% increase from 2022 levels!

London is the most fashion-forward city in the world. It's also a good place to shop for high heels for men, as many stores specialize in selling them. The men's fashion scene is growing rapidly, and there are many stores that sell high heels for men. You'll find everything from classic black pumps to sexy patent leather boots or lace-up loafers with chains attached — especially,there are even some sparkly pairs available too!

Tokyo is a city of contrasts, where you can find high heels and sneakers at the same time. It’s also home to some of the best nightlife in all of Asia, making it an ideal place for any man who wants to dress up on a regular basis. If you're looking for something more low-key, there are plenty of other options: Tokyo has some great shopping districts as well as traditional markets where you can get your hands on just about any shoes!
Check out DECIBEL Blog

Platzierung der Akustikplatten in Ihrem Musikstudio
In diesem Leitfaden befassen wir uns mit der Kunst der optimalen Platzierung von Akustikpaneelen, um Ihnen dabei zu helfen, eine harmonische Hörumgebung zu schaffen, die wirklich Resonanz findet.
📖4 Minuten Lesezeit
Musik ist die stärkste Form der Magie.
Marilyn Manson
Wenn es darum geht, die Akustik Ihres Raums zu verändern, sind Akustikplatten ein wirkungsvolles Werkzeug. Diese Platten wirken wahre Wunder. Sie dämpfen Echos, reduzieren Lärm und klären den Klang. Um ihr volles Potenzial auszuschöpfen, ist jedoch die richtige Platzierung entscheidend. In diesem Leitfaden behandeln wir die Kunst der optimalen Platzierung von Akustikplatten. So können Sie eine harmonische Klangumgebung schaffen, die wirklich mitschwingt.
1. Identifizieren Sie Reflexionspunkte
Beginnen Sie damit, Reflexionspunkte zu identifizieren. Das sind Oberflächen, an denen Schallwellen abprallen und Echos erzeugen. Schallwellen prallen von den Reflexionspunkten ab. Zu diesen Punkten gehören Bereiche wie Wände, Decken und Ecken. Dieses Abprallen erzeugt Echos. Die Konzentration auf drei wichtige Reflexionspunkte kann die Akustik erheblich verbessern. Diese sind: der Spiegelpunkt. Er befindet sich zwischen Lautsprecher und Zuhörer. Es gibt auch die Seitenwände mit den Lautsprechern. Die Decke befindet sich zwischen den Lautsprechern und dem Zuhörer.
Platzierung Akustikplatten An diesen Stellen werden die Reflexionen abgefangen und absorbiert, wodurch verhindert wird, dass der Klang matschig und undeutlich wird.
Sehen Sie sich die Infografik am Ende des Artikels an.
2. Der erste Reflexionspunkt für Sprecher
Für optimale Klangqualität sollten Sie den ersten Reflexionspunkt Ihrer Lautsprecher ansteuern. Dieser Punkt ist die Stelle, an der eine direkte Linie zwischen Ihren Lautsprechern und Ihren Ohren verläuft. Um diesen entscheidenden Bereich zu finden, setzen Sie sich an Ihre Hörposition.
An dieser Schnittstelle sollten Akustikplatten angebracht werden. Sie sollten sich auf Ohrhöhe befinden. Diese Platzierung minimiert die Auswirkungen reflektierter Schallwellen. Sie stellt sicher, dass Sie Musik oder Dialoge klar und ohne Störungen hören.
3. Die Decke
Vergessen Sie die Decke nicht! Vertikale Reflexionen sind in jedem Aufnahmeraum entscheidend. Die Bewältigung von Echos von oben kann Ihre Audioqualität erheblich beeinträchtigen. Sie beeinträchtigen die Klarheit und Präzision.
Sie können die Schallreflexion verringern. Hängen Sie dazu
Auch zum
4. Ecken sind wichtig
Ecken sind dafür bekannt, dass sie den Schall einfangen und dröhnende Bässe erzeugen. Bassfallen in Raumecken verhindern die Anhäufung von Niederfrequenzen. Sie sorgen für einen klareren und definierteren Klang. Um eine ausgewogene Schallverteilung aufrechtzuerhalten, können Sie auch Hochfrequenzpaneele in Ecken anbringen.

5. Verwenden und Verbreiten
Wenn Sie in Ihrem Musikstudio eine hervorragende Akustik anstreben, ist die Platzierung des Diffusors entscheidend.
Eine allgemeine Richtlinie ist, Diffusoren wo Schallreflexionen stark ausgeprägt sind. Dies ist an Wänden hinter Lautsprechern oder in Aufnahmebereichen der Fall. Diese Platzierung hilft, Schallwellen zu streuen. Sie reduziert Reflexionen und verbessert die Klangklarheit Ihres Raums.
Speichern die Infografik am Ende des Artikels zur späteren akustischen Orientierung.
6. Hinter dir
Ebenso wichtig ist es, sich um den Bereich hinter Ihnen zu kümmern. Wenn Sie Paneele hinter Ihrer Hörposition platzieren, können Sie nach außen dringenden Schall absorbieren.Dies verbessert die allgemeine Klangklarheit und gewährleistet gleichzeitig ein angenehmes Hörerlebnis für alle.

7. Wand-zu-Wand-Platzierung
Erwägen Sie, die Paneele über die gesamte Wand zu legen. Dadurch wird eine gleichmäßige Schallabsorption erreicht. Das ist sehr effektiv. Das gilt insbesondere für große Räume. Schallwellen können leicht hin und her springen.
Durch die Platzierung von Wand zu Wand wird ein einheitliches Hörerlebnis gewährleistet und Schwankungen in der Klangqualität werden minimiert.

8. Mischen und Anpassen
Verschiedene Panels dienen unterschiedlichen Zwecken. Schallabsorber aus Schaumstoff eignen sich hervorragend zur Kontrolle von Schallreflexionen. Diffusoren Streuen Sie Schallwellen für eine natürlichere Atmosphäre.
Durch die Verwendung verschiedener Plattentypen können Sie überschüssigen Schall absorbieren und eine lebendige Atmosphäre aufrechterhalten. Betrachten Sie die leistungsstarke Kombination aus Holz-Akustikplatten Denken Sie auch an Textile Akustikplatten Und Bassfallen .

9. Testen und anpassen
Die Platzierung von Akustikplatten ist keine exakte Wissenschaft. Es ist wichtig, verschiedene Anordnungen zu testen und auf die Klangveränderungen zu achten.
Beginnen Sie mit ein paar Platten. Fügen Sie nach und nach weitere hinzu und beurteilen Sie dabei die Klangverbesserungen. Ihre Ohren sind Ihr bester Ratgeber bei der Suche nach der perfekten Anordnung.

10. Berücksichtigen Sie die Ästhetik
Akustikplatten müssen nicht unattraktiv oder optisch störend sein.
Durch den Einsatz dieser Paneele als Gestaltungselemente erzielen Sie eine bessere Akustik und eine schönere Optik.

11. Experimentieren und genießen
Die Platzierung von Akustikplatten ist ein dynamischer Prozess. Wenn Sie mit der Anordnung experimentieren, behalten Sie das Ziel im Auge. Es geht darum, einen Klangraum zu schaffen, der Ihrem Geschmack entspricht.
Mit etwas Zeit und Mühe werden Sie die richtige Anordnung finden, die das Beste aus der Akustik Ihres Raums herausholt.
Besuchen Sie unsere Galerie, um visuelle Inspiration zu erhalten.
BONUS: Exklusiver Profi-Tipp von unseren Akustikern
Die Schaffung einer perfekten akustischen Umgebung in Ihrem Musikstudio ist entscheidend. Ein Konzept hat sowohl bei Zuhörern als auch bei Regisseuren an Popularität gewonnen: LEDE – Live End Dead End. Dieser neue Ansatz teilt Ihr Studio in zwei Hälften. Jede hat einen einzigartigen Zweck bei der Verbesserung der Klangqualität.
In der ersten Hälfte, dem sogenannten „Dead End“, finden Sie Akustikplatten und Bassfallen. Sie erzeugen einen stark absorbierenden Bereich in der Nähe der Lautsprecher. Diese Zone dient dazu, unerwünschte Reflexionen von Ihren Lautsprechern einzufangen und zu entfernen. Auf diese Weise wird sichergestellt, dass der Klang rein und unverändert bleibt und frei von Verzerrungen ist.

Auf der anderen Seite haben wir das „Live End“. Diese Hälfte des Raums beginnt in der Mitte zwischen Ihren Ohren und geht nach hinten. Sie hat Diffusoren. Diese Diffusoren streuen Schallwellen. Sie tun dies auf eine Weise, die die Akustik alltäglicher Wohnräume wie eines gemütlichen Wohnzimmers oder eines Schlafzimmers nachahmt. Dieser Diffusionseffekt macht den Klang weich und angenehm. Er verhindert, dass er trocken oder übermäßig kontrolliert wird.

Das Geniale am LEDE-Konzept ist seine Fähigkeit, Surround-Sound zu erzeugen. Dabei werden störende Reflexionen vollständig eliminiert. Es ist die perfekte Mischung aus Absorption und Diffusion. Es sorgt für die beste Akustik in Ihrem Musikstudio.
Um Ihr LEDE-Setup zu erweitern, versuchen Sie, die Platzierung der Bedienfelder zu ändern.Ändern Sie außerdem, wie viele und welche Typen Sie verwenden. Durch Anpassen dieser Elemente können Sie genau den gewünschten Klang erzielen. So können Sie den Sound Ihres Studios an Ihren Geschmack anpassen.
Denken Sie daran, dass LEDE flexibel ist. Passen Sie es also an und verfeinern Sie es, bis Sie den Sweet Spot gefunden haben, der Ihre Musik zum Strahlen bringt.

Echos des Wissens
Denken Sie daran, dass die optimale Platzierung von Akustikpaneelen eine Mischung aus Wissenschaft und Kreativität ist. Sie können Ihren Raum in eine Oase des Klangs verwandeln. Platzieren Sie die Paneele an Reflexionspunkten. Platzieren Sie sie auch in Ecken, an Decken und hinter Ihrem Hörbereich. Es gibt jedoch keinen einheitlichen Ansatz. Es geht darum, die Konfiguration zu finden, die zu Ihrem Raum und Ihren Vorlieben passt.
Lassen Sie also mit dem Experimentieren beginnen und genießen Sie eine Klanglandschaft, die wirklich singt.
Vergessen Sie nicht, sich unsere Infografiken unten anzusehen.

Laden Sie die Infografiken als E-Book herunter HIER .
Conclusion
In the pursuit of sonic excellence, soundproofing and acoustic treatment are the unsung heroes. Whether you're a professional musician navigating the vast sea of sound or a budding enthusiast setting up your first home studio, investing in these essentials is a commitment to your craft. Let your music reverberate in a sanctuary of sound, where every note is heard, felt, and cherished. Elevate your studio experience – because the world deserves to hear your music in its purest form.
Have Any Questions?
We are here to answer all of your queries